March 18, 2014

winter blues...


I can't wait for spring. This winter is taking its toll... extreme cold temperature for longer than usual periods of time. The bright sunshine is the only reprieve from the bitter cold. It streams through my windows and fills the rooms with warmth and light. Thankful for the sunbeams.


Thinking spring I made these using some of my Curtsey Boutique goodies for a co-worker of mine, using my paper scraps. I often don't have the heart to throw away even the smallest of pretty paper scraps.  Two different versions, one with stitching and one using ric-rac. Pretty CB sequins add a pop of sparkle.


Some Basic Grey papers add an almost sky-like background. An added doily mimics the kite flying high in the clouds... Hope you like it:)
Before I go, a little song we used to sing on Good Friday, where our tradition was making paper kites and flying them all day long. Like stained glass windows in the sky...

Let's go fly a kite,
Up to the highest height!
Let's go fly a kite,
And send it soaring.
Up through the atmosphere,
Up where the air is clear
Oh, lets go fly a kite..
(From Mary Poppins)

Thanks for popping by!
~Becks

Curtsey Boutique supplies:
Turquoise Sequins

March 6, 2014

doing it for Duncan...

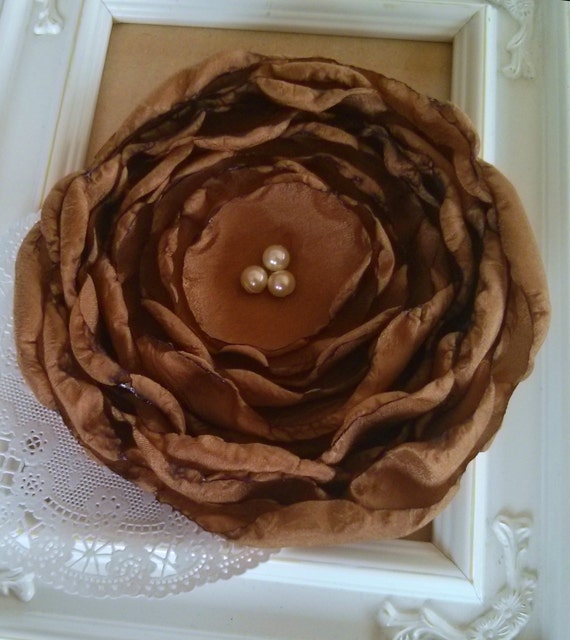
 Extra Large Vintage Gold Fabric Flower -  Raise Awareness for Childhood Cancer - Duncan Campbell -  Brooch, Hair Barette, Headband
Hi there,

Just popping in to share a quick post... doing my small part to help out someone in need. For the month of March over at The Curtsey Boutique, CarrieAnne has a special limited edition gold flower. The sales of this flower will go towards helping out a family dealing with a terrible situation. One which no family should ever have to deal with. You can read CarrieAnne's original post HERE... and if you feel like supporting the cause, you can purchase the flower HERE.

Thanks for letting me share,
~Becks


March 2, 2014

celebrate today...

This year I decided to send out fun 'outside of the box' cards after the hustle and bustle of Christmas had died down. Usually each year my best intentions to get Christmas cards out fails, generally because I'm too busy making cards for other people.. I won't complain... no, never. I love seeing people's faces when they get their stacks of handmade cards made by me. Such a great feeling. So, instead of worrying about Christmas cards, my new tradition will be to send out greetings in the new year. 

Here's a little tutorial I did on my 'cards' for this year for Curtsey Boutique:


Measure and fold a medium sized glassine bag to fit inside a standard envelope. Wrap a 6 inch doily around the front of the bag and secure with tape. Fill glassine bag with various sizes, colours and textures of confetti. Add sequins. Sew top of bag at the fold with gold thread to keep confetti in.


On your computer using Word or Photoshop, create a tall rectangular greeting and print out. Trim bottom edge to make it look like a long banner. Edge with glitter and adhere using a stapler. Add snowflake embellies. Stamp a greeting along the bottom edge of the bag and heat emboss.


*Technique tip* To get a perfect straight edge of glitter all around the banner, carefully adhere double side tape to all edges making sure there are no gaps. Peel off other side and cover liberally with glitter. Press the glitter into the tape before shaking off excess. Perfect, straight glitter lines every time!
Shake up the confetti and enjoy!

Curtsey Boutique Supplies:
Medium Glassine Bags
6 inch doily
Christmas Snowflake Die cuts


Other Supplies:
Gold Thread – Ravelry
Sequins-Craft supply
Confetti
Card stock + printer
Double side tape
Glitter

December 17, 2013

may all your Christmases be white...


I'm dreaming of a white Christmas... it makes the day seem more cozy and special. Almost like you are in a snow globe. I just love that feeling. Every year I put up the handmade snowflakes my sister makes me. She is super talented. Even if there is no snow falling, every time I look at the window I see beautiful snowflakes.


These were the inspiration for one of my favourite cards this year. I found all sorts of pretty wooden snowflakes at the craft store and couldn't resist painting them and glittering them up in a shower of sparky goodness...


I'm dreaming of a white Christmas
With every Christmas card I write.
May your days be merry and bright,
And may all your Christmases be white...

~Becks

Supplies used:
Curtsey Boutique Doily
Curtsey Boutique Snowflakes

December 2, 2013

candy cane christmas...


Another month has come and gone and we're having another Linky Party over at the Crafty Secrets blog. I hope you all will join in for your chance to win a $50 gift certificate to Crafty Vintage Girl store and every one who enters gets a $6 gift certificate just for playing along. All you have to do is create something magical using fabulous Crafty Secrets products!


Today I'm gearing up for my Christmas dinner and one of my favourite things is the table setting. I think it's the best part of the meal. This year I've made candy cane place settings. I've seen these all over Pinterest, from simple to fancy and I've decided to try it out today.

Start by gathering all of your supplies:


Gather the three candy canes and form a tripod. I used washi tape to keep them together. You could use glue, but if you plan on eating the candy canes after it's easy to peel them apart if using washi.

 Wrap the doily around the journal card and add a snowflake with 3D tape. Add a chalkboard label on top with more 3D tape. Decorate with wooden snowflakes.


Tie a ribbon around the top of the candy canes and add some tinsel twine.


All ready to be labelled with some chalk and set on the table. I can't wait! It's so easy to do any theme for your table.

Be sure to check out the rest of the team:)
Vicki Chrisman (Team Leader)

Michele Kovack

Darlene Pavlick

Melissa Bove

Sheila Rumney

Kathy Clement

Elizabeth Lincoln  

Cherry Nelson


Happy Holidays!
~Becks

 Supplies used:
CS Christmas Image and Journal Notes
Ivory and Black Christmas Paper from CD 6

November 28, 2013

pocket full of love...


I finally got around to sending out my wedding thank-you cards. It always seems to take twice as long when you make your own by hand. It was the last DIY touch to our wedding, and I love how they turned out.


Since our day was full of love and family, I wanted our thank-you cards to reflect the feelings of the day. The hearts burst out of the envelope and seem to float away; our way of spreading the love to all who were there and who couldn't be there, but had us in their thoughts.

I used the same muted colours we had for our wedding. I just love creams and soft pink together.The doily theme stayed with me, (I used large french doilies to wrap our invitations and then tied with some rustic twine) as well as a little lace- to remind me of the pretty, vintage tablecloths my mama found and let me borrow. So many great memories wrapped up in these little cards.

I hope everyone loves receiving them as much as I did making them.

~Becks

Supplies used:
Curtsey Boutique Silhouettes
Curtsey Boutique Doilies


November 12, 2013

prepping for the season...

It's the time of the year I love... Christmas is approaching and I always seem to have a crafty list as long as my arms. So many great ideas to put into play. Maybe one of these years I'll get a good jump start on the season and complete all of my lists.


On the top of my last few lists has been doing a December Daily. I love the whole idea, yet I'm never on top of things enough. This year I've tried to get started and am making progress. I envision a shabby chic, pages of all sizes and shapes, envelopes decorated and stuffed with journal and great embellishments.


To get started I've used some bits and bobs I had left over from my Crafty Secrets Christmas Cd's 5(Retro) and 6(Vintage) Christmas,  and created some journal tags to put into clear pockets. They were so much fun to create using all my leftover scraps. I hardly throw anything away, and it's paid off here:)


Using some dies, twine and buttons along with half pearls and some stickers its easy to create oodles of these. Pennants of all shapes, sizes and colours are seperated by some 3D tape and layered on top of one another.


For these I chose to repeat colours, patterns and shapes so they all have some uniformity throughout my journal. I hope to pop back soon with some other pages of my December Daily album.

Until then my friends!
~Becks.